How Do Concealed Floating Shelf Brackets Perform vs Traditional Mounting Systems
How to Install Floating Shelf Brackets on Wavy or Uneven Walls
Installing concealed floating shelf brackets on wavy or uneven walls takes some care with how the wall sits and how you line things up. You check the bumps early on. Then you tweak how deep you drill and how straight the brackets sit. This keeps the shelf solid without losing that clean look. When you get it right, the shelf stays steady even if the wall has its own quirks.
Understanding Concealed Floating Shelf Brackets
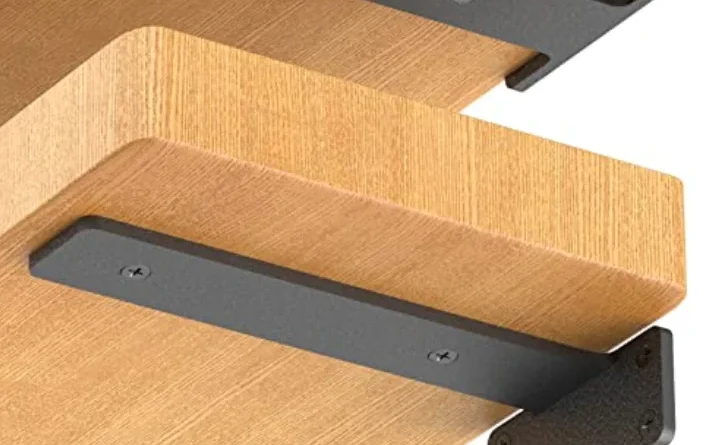
Take a moment to see how these hidden brackets work before you start. They hide the support pieces so the load moves straight into the wall frame.
Structural Design and Load Distribution
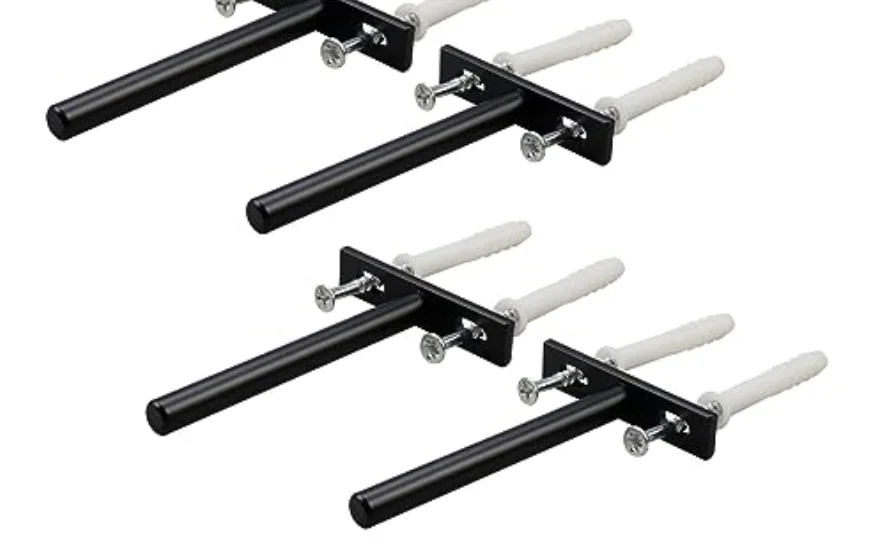
These brackets use steel rods or arms that go into the studs. Nothing shows on the outside. The steel spreads the weight so the shelf does not bend much over months of use. Rod length and thickness matter a lot. Longer rods spread the pull better, yet they need to sit deeper in the wood behind the wall.
Think about it like picking gear for a home power setup. The right bracket choice decides whether the shelf lasts or starts to droop. Short rods work fine for light decor, but books or plants need the longer ones.
Material Composition and Manufacturing Precision
Most brackets use strong steel or aluminum. The metal stays stiff when weight sits on the shelf. Makers machine the parts so gaps stay small. That stops wall bumps from pushing the shelf out of line. Many add a powder coat or zinc layer to fight rust, especially near sinks or showers. The coating keeps the metal from wearing down after years of steam and spills.
Assessing Wall Conditions Before Installation
Look at the wall closely before any holes go in. Bumps and dips throw off your level line and add up when you hang more than one shelf.
Identifying Wall Irregularities and Surface Deviations
Run a long straight board or shine a laser across the surface. You will spot where plaster or drywall dips or bulges. Some waves come from the studs themselves settling over time. Others come from thick paint layers or old repairs. In houses built before 1950, the plaster often sags a bit between studs. A small 3 mm dip might not look like much until the shelf is full and one end sits lower than the other.
Preparing Uneven Walls for Mounting
Mark the low spots with tape. Fill small dips with joint compound and let it dry hard. For bigger waves, screw a thin plywood strip to the studs first. That gives you a flat plane to work on. Draw your level line across the tape so every bracket lines up even if the wall texture changes. The tape also keeps pencil marks off the paint.
Installation Techniques for Uneven Wall Surfaces
Once the wall map is ready, stay flexible while you drill. Each spot may need its own depth or a small shim so the rods come out even.
Adjusting Bracket Placement for Stability
Check the wall with the level after every few holes. If one bracket sits proud, add a washer or two behind the base plate. This pulls the rod tips into the same plane. Tighten the screws a little at a time and recheck. Rushing this step often means pulling everything out again later.
People who hang shelves in old apartments learn to test the first bracket with a heavy book before they commit to the rest. That quick check saves time.
Anchoring Methods for Nonuniform Substrates
Drywall and Plaster Walls
Find the studs with a good detector. Hollow anchors alone will not carry real weight on a wood shelf. When studs sit too far apart, toggle bolts rated for at least 30 kg each give extra hold. Always add a safety margin for the things people actually put on shelves.
Masonry or Concrete Walls
Use a carbide bit and go slow. Blow the dust out of each hole before you drop in the expansion anchor. A dab of silicone around the hole keeps water from creeping in and rusting the metal later. This matters in basements or laundry rooms where moisture stays in the air.
Evaluating Load Capacity on Uneven Installations
After the brackets sit tight, test how they handle weight. Small gaps behind the base change how force travels along each rod.
Factors Influencing Weight Distribution
Place the shelf center over a stud line when you can. That keeps torque low at the ends. Longer rods spread the load, yet they need enough wood depth. Thin partition walls sometimes force you to use shorter rods and lighter loads. A 60 cm shelf with books can weigh 20 kg once full, so plan accordingly.
Testing Stability After Mounting
Start with a few kilograms and watch the middle of the shelf. Add more weight in steps while you check for any downward bend. Leave the load on overnight and check again the next day. Screws sometimes settle a little after the first hours. In damp rooms, check the level again after a humid week because wood and drywall can shift slightly.
Enhancing Aesthetic Integration Without Compromising Strength
Floating shelves need to look clean while staying safe. The two goals do not always line up, so balance matters.
Achieving Seamless Visual Results on Imperfect Walls
Small gaps along the back edge disappear with a thin bead of paint-matched caulk. On very wavy plaster, choose a thicker shelf board. The extra depth hides the uneven contact points and keeps the front edge straight. Avoid forcing the shelf tight if it wants to rock; that only stresses the rods over time.
Balancing Design Minimalism with Structural Safety
Thin shelves look sharp in photos, yet the bracket still needs the depth the maker recommends. Cutting corners on embedment just to gain a few millimeters of thinness often leads to wobble within a year. Stick with the stated minimums even when the style tempts you otherwise.
Maintenance and Long-Term Performance Considerations
Even solid installs need a quick look now and then as seasons change.
Monitoring Structural Integrity Over Time
Check the brackets twice a year. Look for any tilt or loose screws, especially near doors that slam or washing machines that shake the floor. A quarter turn with the screwdriver usually fixes early looseness before it grows into a bigger problem.
Environmental Factors Affecting Stability
Metal and wood expand at different rates when the house heats and cools. That small movement can back screws out over a few winters. In coastal homes, salt in the air speeds up corrosion, so a quick wipe with a dry cloth every few months helps. Seal the pilot holes before you drive the screws in the first place; this step alone cuts moisture damage in half in most rooms.
FAQ
Q1: How do concealed floating shelf brackets stay hidden?
A: Internal steel rods slide into holes drilled in the shelf itself. The rods then lock into wall studs so nothing shows once the shelf sits in place.
Q2: What tools are essential when mounting on uneven walls?
A: You need a laser level, a stud finder, a variable-speed drill, a pack of shims or washers, and masonry bits if the wall is brick or block.
Q3: Can heavy loads be supported on plasterboard without studs?
A: Only after you add plywood backing screwed to the studs behind the plasterboard. Toggle bolts can work for lighter loads, yet most installers cap them at 15 kg per bracket without solid wood behind them.
Q4: How often should floating shelves be checked after installation?
A: Give them a look every six months. Tighten any screws that have eased out, especially after big humidity swings in spring and fall.
Q5: Is there a way to correct slight sagging after installation?
A: Yes. Take the items off, loosen the screws a turn, slip thin shims behind the low side until the shelf reads level, then snug the screws again without stripping the anchors.


