How to Optimize Your Workflow Using the Advanced Elkay LK99 Design
How to Install Your Elkay LK99 Drain Fitting (Step-by-Step)
The Elkay LK99 drain fitting works well for both home and business sinks. It lasts a long time and fits many setups. People who put in lots of these fittings save time and see fewer leaks. This guide goes over how the part is built, how to put it in place, and how to keep it working right after.
Understanding the Elkay LK99 Drain Fitting
The Elkay LK99 stands out from plain drain parts. It mixes strong build with simple use. Take a moment to see why the shape helps it last many years.
Overview of the Elkay LK99 Design and Structure
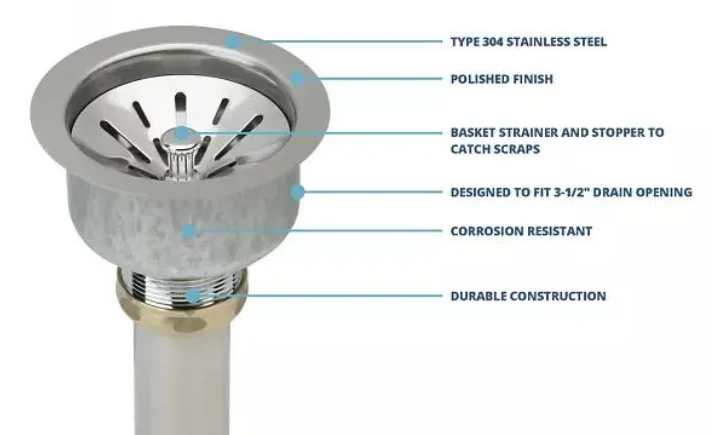
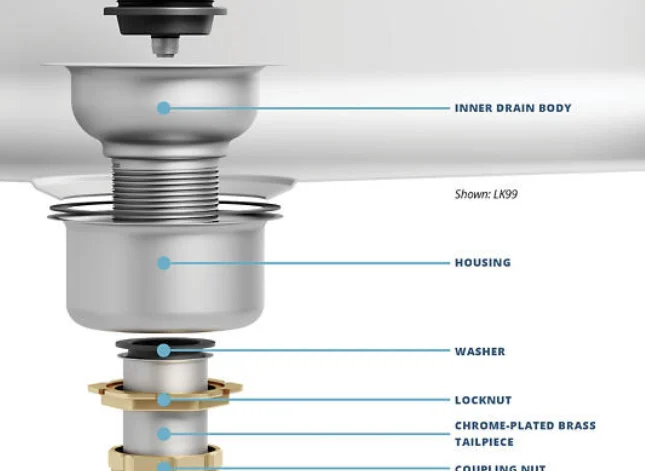
This fitting comes with a stainless steel body, soft gaskets, locknuts, and a top flange. Each part stops water from leaking and fights rust. The steel holds up like the tough parts found in big restaurant kitchens. It works on single sinks, double sinks, and small bar sinks too. That makes it handy for many different pipe layouts.
The threads line up evenly and the seals stay tight even when water gets hot or cold fast. Many workers notice these small points cut down on extra trips back to fix tiny drips or parts that sit crooked.
Functional Advantages of the LK99 Model
The shape lines up fast with the hole already in the sink. Rubber gaskets cut down on extra glue while they still bend a bit when you tighten things. The finish stays clean even in damp rooms, which helps near the ocean or in busy food places.
Workers often say this model acts like full sets where one group made every piece so they fit together better. The same idea works here with metal parts. When pieces come from one plan, they match and cause fewer problems down the road.
Preparation Before Installation
Good prep keeps the job from turning into a headache later. Check sizes, wipe surfaces, and gather what you need before you start so you do not have to redo steps.
Assessing Sink and Plumbing Compatibility
Check the sink hole size. Most measure three and a half inches across. Look at the old pipe threads for rust or wear that might stop a good seal with the new threads. Make sure the whole setup follows the rules in your area for traps and air vents.
In places with many sinks, like eateries or labs, line up the new part with the old tailpieces first. That saves time once you begin turning wrenches.
Tools and Materials Required for Installation
You need a couple of wrenches that adjust, some putty or sealant, a tape measure, and a clean cloth. Code may call for thread tape on the joints. Wear glasses and gloves so sharp metal edges do not nick your hands.
Some workers keep a torque wrench close so they do not squeeze too hard and crack the flange or mash the gaskets flat.
Step-by-Step Installation Process of the Elkay LK99 Drain Fitting
With tools ready and sizes checked, work through each step in order. This gives a tight seal without extra fixes later.
Pre-Assembly Inspection and Setup
Look over every piece in good light. Watch for dents or rough spots that might let water sneak past. Wipe the sink hole and the space below it clean. Even tiny bits of dirt can stop the gasket from sitting flat. Spread putty around the bottom of the flange if the directions call for it. This keeps water from finding small gaps between the metal faces.
On sinks with a brushed look, use a soft cloth so you do not leave marks on the shiny parts you will see every day.
Installing the Drain Body and Gasket Assembly
Push the body down through the top hole. Hold it from below so it does not drop. Set the gasket right under the basin. Start the locknut by hand first. This stops the threads from crossing. Turn a little on one side, then a little on the other. Keep going that way until the seal presses evenly.
After the first turns, pour a cup of water in the sink. Watch how it flows out the bottom before you finish tightening everything.
Securing Locknuts and Final Adjustments
Keep turning the nuts until they feel snug. Do not go past that point or the gaskets can get squished out of shape. Look at the seal from below. A small bulge shows the pressure is right without hurting the parts. Wipe off any putty that squeezed out around the edges.
Run water again to check for drips at the joints before you hook up the trap or the waste pipe farther down.
Enhancing Installation Efficiency with the Elkay LK99 Design Features
New fittings like this one help workers finish faster. That matters when a crew has many jobs in one day.
Time-Saving Elements in the Design Architecture
Some versions come with gaskets already in place. That removes one step on the job. The threads catch smoothly even when you work in tight spots under a counter. Built-in seals mean you carry fewer loose rings that can roll away on the floor.
One worker told me about a kitchen job where the old fitting took twice as long because parts kept falling. The LK99 stayed together better and cut that time down. Fewer loose pieces also mean fewer spots where something can fail later.
Reduction of Common Installation Errors
The threads are cut to exact sizes. This lowers the chance the nut goes on crooked, especially on older sinks where the hole may sit a bit off. Small marks on the parts help line everything up the same way each time. That helps new workers get the same result as someone who has done the job for years. Fewer parts in the box also means less chance a piece gets left on the truck.
Maintenance Considerations After Installation
Even a well-fitted drain needs a quick look now and then. Heat changes and strong cleaners can wear parts over time.
Routine Inspection Practices for Longevity
Check the metal every three months or so. Look for dark spots or color changes near the joints. Swap out gaskets when they look flat or cracked. Use plain soap and water on the finish instead of rough pads that can scratch it.
Watch how fast water leaves the sink. A slow drain often means something is caught in the pipe, not a problem with the fitting itself.
Troubleshooting Minor Performance Issues
If a small drip shows up later, turn the locknuts just a quarter turn more. That often stops the leak without taking everything apart. For drips at the threads, clean the old tape or sealant off first, then put on a fresh layer.
Extra parts stay easy to buy from the same suppliers. You do not need to replace the whole unit if only one gasket wears out. That helps building crews who keep stock for many locations.
Practical Insights from Professional Installers on Using Elkay LK99
Real jobs show how the design works once the sink is in daily use. The difference shows up in homes and in busy prep areas alike.
Common Field Observations During Installation Projects
Workers say they finish about one fifth faster than with plain fittings. The parts line up easier in tight spaces under sinks that sit below the counter. That cuts down on sore backs during long days with many units to do. Tests show the seal still holds after years of hot water and cold water cycles. One crew noted no callbacks on a school cafeteria job six months after they used these fittings. The same idea holds for other trades: pick strong parts at the start so the whole system stays reliable longer.
Recommendations for Optimizing Workflow Efficiency
Lay out every piece near the sink before you crawl underneath. That small habit keeps you from climbing up and down for one missing nut. Put the drain fitting in at the same time as the faucet when you can. Both jobs need the same open space below the counter. Keep the same snug feel on every nut across a big job so all the sinks drain the same way. Hotel kitchens and school lunch rooms need that kind of steady result.
FAQ
Q1: What material is used in the Elkay LK99 drain fitting?
A: The main body is stainless steel. Rubber gaskets sit inside to stop rust and keep water from leaking for many years of use.
Q2: Can plumber’s putty be replaced with silicone sealant?
A: Yes, silicone works in place of putty on some sinks. Check the sink material first because some plastics do not like certain sealants.
Q3: How often should gaskets be replaced?
A: Most last a few years. It depends on how much the sink sees each day. Look at the edges. If they look flat or split, put in new ones.
Q4: Is professional installation necessary?
A: Many home users can follow the steps and finish the job. Big commercial sites usually need a licensed plumber to meet local rules.
Q5: Why choose Elkay LK99 over generic models?
A: The parts fit together with tight tolerances. That lowers leak chances, speeds up the job, and gives the same long life seen in heavy-use commercial spots around the world.


