What Makes Rivet Nut Installation in Thin Sheet Metal More Reliable
Understanding Rivet Nut Installation in Thin Sheet Metal
Putting a rivet nut into thin sheet metal takes careful work. You need to watch how the material bends, the shape of the hole, and how the tool works. When you do it well, it gives a solid, usable thread in stuff that’s too slim to cut threads into right away. People use this method a lot in car body parts, air conditioning boxes, and boxes for electronics. They need places to screw things in without welding or cutting threads directly. In my experience from shop floors, getting this right can save hours of headaches later.

The Function and Design of Rivet Nuts
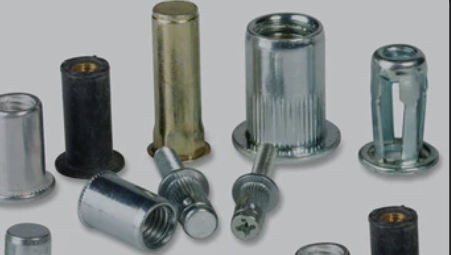
A rivet nut works as a fastener and a strong holder. It gives tough inside threads even if the main material is just a couple of millimeters thick. As you set it, the main part of the rivet nut squeezes together behind the sheet. This squeeze makes a tight hold. That hold fights against pulling out and turning. The wide top part spreads out the push force over the surface. It stops too much pressure in one spot that might crack or twist the metal.
Rivet nuts come in different shapes based on what you need. Some have rough sides for better hold against twisting. Others have plain sides for softer stuff. Their shape spreads out the weight nicely. It also keeps the threads working well even after you use them many times. For instance, in a car door panel, a simple round one might do the trick, but add some roughness if vibrations are an issue.
Challenges of Working with Thin Sheet Metal
Thin sheet metal brings problems that thick stuff doesn’t. There’s not much depth for threads to grab. So, the hold comes only from the rivet nut pushing out behind the panel. If the sheet bends too much while you set it, the position might move. Or the connections could come loose with shakes.
The hole size must be just right. A hole that’s too big lets it slip around. One that’s too small squeezes too hard. That can crack the edges. Picking the correct tool helps. Manual ones, air-powered, or liquid-powered ones control the bend. They keep the structure strong. Think about a 0.8 mm aluminum sheet—it’s easy to push too far if you’re not careful.
Factors Influencing Reliable Rivet Nut Installation
Getting steady results with rivet nuts comes down to a few things that work together. These include matching materials, getting the hole ready, and watching the steps during setup.
Material Compatibility and Selection
Pick materials that go well together to avoid rust from different metals touching. For example, aluminum rivet nuts fit aluminum sheets in light setups. But they might rust with steel unless you coat them right. Steel rivet nuts give more power but need covers like zinc to fight rust. Stainless steel ones are great for outside or boat use. They hold up against rust even if they cost more.
Extra layers like special washes or hard coatings make them last longer. These layers block water and chemicals. In salty air near the ocean, I’ve seen uncoated steel fail fast, but stainless ones keep going for years.
Hole Preparation and Tolerances
Getting the hole ready with care boosts the joint’s strength. The hole width should follow the maker’s sizes. Stay within close limits, often plus or minus 0.1 mm. This lets it bend properly without sliding. Leftover rough bits after drilling can start weak spots. Over time, these lead to breaks near the top part.
Keeping holes lined up matters too when you use many rivet nuts in a build. If they’re off, the weight paths get uneven. That cuts down on how well it all works. A good drill press with a jig can make this easy, cutting errors to almost zero in batch work.
Installation Techniques for Enhanced Reliability
The way you set the rivet nut decides if your work stays the same over many runs.
Manual vs Pneumatic vs Hydraulic Tools
Hand tools work for test pieces or small jobs. You can see and feel the squeeze as you go. They’re not fast but cheap for fixes or small repairs.
Air tools give even pull with air pressure. They’re good for middle-sized lines where speed counts but you still need care. Liquid tools rule big factory runs. They let you adjust the push length and strength finely. This cuts down on differences between each one you set.
From what I’ve seen in workshops, switching to air tools sped up a team’s output by double without losing quality.
Controlling Installation Force and Stroke Length
Too little or too much squeeze causes problems you might miss until you test them. Squeezing too hard twists the threads or breaks thin sheets. Not enough squeeze leaves spaces under the top. That lets it turn when you screw in a bolt later.
Check your tools often to keep the pull in the right range. Newer ones have screens that show the push steadiness over groups. It’s a small cost compared to fixing bad joints. Aim for a pull of around 500-1000 pounds, depending on the size—check your manual.
Mechanical Performance Considerations
Once it’s in, tests check if the rivet nut holds up under real loads.
Pull-Out Strength and Torque Resistance
A good setup should fight straight pulls without coming loose. The pull-out strength ties to how hard the material is. It also depends on how even the back bulge forms when you set it. The twist hold comes from rub between the rough side, if it has one, and the sheet. This stops spinning when you tighten bolts.
Test groups with shakes or heat changes to make sure they last. In truck parts, for example, they often run 1000 shake cycles to mimic road bumps.
Load Distribution Across Thin Sheets
The top design helps here. Big tops spread the push forces evenly over slim parts. This cuts down on too much stress in one place that might tear the edges. In key spots like plane supports or box for gadgets, folks add flat rings or sticky glues with rivet nuts. This boosts the hold without much extra weight. Sometimes, a simple washer doubles the strength—easy fix for weak spots.
Quality Control and Inspection Practices
Small slips during setup can hurt the whole joint. So, checks at each step are a must.
Visual and Dimensional Inspection Methods
Eye checks make sure it’s set at the right height. The top should touch the surface flat with no spaces or breaks around the edge. Size checks with tools confirm the thread quality after many setups. Loads over time might bend inside threads a bit.
Check the surface too because scratches or hurt coatings show raw metal. That can start rust early in wet or salty spots. A quick wipe and look can spot issues before they grow.
Non-Destructive Testing for Installed Rivet Nuts
For hidden flaws like bad squeezes in tight spaces, sound wave or electric field tests give clues without taking things apart. They find empty spots or uneven sides from wrong tool use.
Some shops do twist-until-break tests now and then. Not on every piece, but on enough from each batch. This checks if the steps stay steady over work times and workers. It’s like insurance—catches drifts early.
Design Optimization for Long-Term Reliability
Thinking about fasteners from the start in product planning often cuts later fix costs. It avoids tight spaces or hard-to-reach spots during build or upkeep.
Integrating Rivet Nuts into Structural Design Early On
When you map out rivet nut spots in computer drawings, save room for tool reach around each one. This way, workers don’t fight bad angles on the line later. Computer strength models predict how stresses spread through nearby material when weights hit via fasteners. It’s a smart move before buying tools.
Starting early also makes fixes simpler. Techs can take off panels without breaking the base thanks to threads you can use again. In one project I recall, early planning shaved weeks off assembly time.
Selecting the Appropriate Rivet Nut Geometry for Application Needs
Round Body vs Hex Body Rivet Nuts
Round ones go in quicker but might turn if the twist force beats the rub hold. Hex ones lock in with six sides into matching holes. That’s common in car frame jobs where shakes are strong.
Knurled vs Smooth Shank Designs
Rough shanks grab softer bases like aluminum sheets better than plain ones. They fight turning even with back-and-forth twists in machine boxes or air flow panels that shake from wind.
I’ve used knurled ones in a noisy factory setup—they held tight where smooth ones slipped after a few months.
Open-End vs Closed-End Configurations
Open ends let long bolts go all the way through. Closed ends keep out dirt or water. That’s a big plus in shut boxes where you need to stay clean, like in gadget shells with strict rules.
FAQ
Q1: What is the main purpose of using a rivet nut in thin sheet metal?
A: It gives strong inside threads where you can’t cut them direct because the stuff is too thin. It keeps the build solid after many put-togethers.
Q2: How do I choose between aluminum and steel rivet nuts?
A: Try to match them—aluminum inserts with aluminum panels for light jobs. Pick steel when you need more pull strength, even if it adds some weight.
Q3: Why does hole size tolerance matter so much?
A: Small changes hurt the grab. Holes too big make it spin. Too small ones push too hard on tool and panel. That causes breaks near the edges.
Q4: Can manual tools deliver reliable results?
A: Yes, if you use them right in the suggested push ranges. They’re best for small jobs where your skill makes up for no auto checks like in air systems.
Q5: What’s the benefit of closed-end rivet nuts?
A: They stop dirt from getting into thread areas. This keeps rust away, key for shut builds in wet or dusty spots over long times.


